Thursday, September 27, 2012

wallpaper gallery

No, i'm not opening my own gallery if you're wondering, rather i decided to sell some of my personal collection of wallpapers. 

This decision was not an easy one for me since i love these wallpapers oh-so-dearly (i hand-picked, cleaned and collected them book by book) but i realized it would be impossible for me to continue production like i used to ever since the old assistant left me. 

I tried making some big wristlets the other day, and somehow it felt more difficult & time-consuming than ever to do just one piece. My new assistant (yes, finally got one) is still practically useless too at the moment. 

Another reason would be that ever since opening paperpleased on facebook, i've discovered some wonderful crafty friends whom i'm sure would be able to create something beautiful with these papers. Call it the other way of "contributing" to the creative community, perhaps?

Most of my collection are one-offs that you wont find being sold at the shops anymore, although unfortunately they don't come with information on the production year. Some of the old ones have slightly turned yellow because of their age, but they have images that are unmistakably "retro" and "nostalgic".

Furthermore, the ones i'm selling are actually the ones i do not dare to make anything with them just yet. Why? simply because i flip them over occasionally to be left mesmerized by their patterns and colors. It really is therapeutic for me.(Okay i have to stop before i sound more like a lunatic.)

For the first collection, i put this children series called "Can You Imagine?" by Goodrich. I'll be adding more over time but if you see anything that you like, you better book it right away because there's only one piece of each. 

Hope you like it.


for complete collection, click here


Thursday, September 20, 2012

happy birthday husband

Being a maker, its funny how i've never actually made anything for my husband. 

He's turning 35 this September, and had been given a Mac Book Pro as a gift from his super generous producer. In need of a new case, he naturally asked me to make one for him.

Looking around in my studio the next day, i found a stash of faux leather that would be perfect for my first experiment in making something with a unisex appeal. Unfortunately, with such thickness, it was impossible to stitch two layers of them using my home sewing machine. I had no choice but to hand-stitch the whole thing (God, have mercy on my fingers).

After some painful hours, i panicked when i realized the case was too short for the Mac. I bet you crafters know how that feels. You feel dizzy and slightly short-of-breath, thinking of the most possible ways you could to save the project. There is no room for failure! (or maybe i just owe it to my fingers).

The most genius invention from the 18th century finally came to the rescue... the zipper!
Putting a zipper seems like the most logical thing to do, not to mention it will be a bonus on practicality if he can get the Mac out with just one hand. (Do you remember that line from "Up in the Air" where Clooney character says the Chinese has a thing for slip-ons (shoes)? i'm that kinda person so i can totally relate to that haha)

So the next day, off i went to a bag repair shop asking if they could put the biggest zipper they have to my handmade case. It didn't take long for me to decide to sew it myself after figuring out it would cost double for them to do it.

Luckily, this time hand-stitching the zipper was not painful at all because i only needed to do one layer at a time (yay!). I also stick a piece of foam on the inner side of the zipper so it wont scratch the Mac surface when it's being opened and closed (a.k.a problem solved!)

Here's how it looks when it's finished... 


faux leather mac book pro case

opened with zipper

The feeling after finishing a project is always priceless, not to mention i was happy to have the opportunity to experiment with a new material and making something for my husband. Talk about feeling of being the best wife ever :D

Saturday, September 15, 2012

upgrade

Its funny how one easily looks at things differently after a long break from the usual routine.

During my hiatus, i took a long hard look at my wallets and felt like a major upgrade was necessary. I have to admit i had been avoiding this brain-racking and rather-frustrating process because i wanted to stay in my "comfort zone". Wouldn't it be nice to keep doing things the way you're used to?

But no, my mind didn't let me and it went restless for weeks after weeks.
Going back and forth to the studio looking for i-dont-know-what, endless browsing for inspirations, all these took place before i bumped into the answers to my problem which were found under my very own working table.


1. CARDBOARD

I finally decided to seriously befriend this material after making the Hardcover Folders. But this time for the reworked edition of accordion-style wallets. I love their hard surface and durability and it's nice to see that they feel nice to the hands too. (Thanks to Isur for the design inspiration!).

To make a difference from the previous non-cardboard wallets pictures, i also made this DIY lighbox (tutorial) that i use to take pictures of the Cardboard series. 

What do you think of the result?


my DIY lightbox

cardboard accordion wallet


see the collection here


 2. FUSIBLE WOVEN INTERFACING

Another humble material that works surprisingly wonderful with the wallpapers. It gives me a non-tear able quality and fluidity for the paper, although i still can't sew and turn it inside out (bummer).

I have tested it making the Big Wristlet along with some waxed string (to replace the nylon filament cord which is a NIGHTMARE to do by myself). Even though it still needs some fixing, i'm already liking its look.


new big wristlet

definitely need to fix the edges!


And that's a glimpse of my creative process lately. Thank you if you're still reading this!

Thursday, September 6, 2012

Handmade Gift Ideas: Deer Wall Mount

I can sense this blog is driving more towards home decors lately, but i can't help it since i spend most of my time being in one. These one-off projects have been a great creative escape from the usual things i make for paperpleased and truth to be told, it's kinda addictive decorating your home with something you make yourself.

I find myself constantly adding and moving things around in my house. Always looking for that one more spot to add a new DIY. After all, one produces beautiful work by surrounding oneself in beautiful things, no? 

And so...i've been looking for something to fill the blank spot above-the-tv on my back wall. At first i wanted a taxidermy, but since i couldn't find a local seller here i let that one go pretty quickly. My second thought was a painted-in-one-color cuckoo clock. Again, finding none that suits my ridiculous super tight budget, i finally decided to make my own that combines the look of taxidermy and a functional clock.

Meet my wallpapered Deer Wall Mount...


wallpapered deer wall mount


This one is measured 50cm x 42cm (including shield).
I spent two days making it using foam (had to leave the glue overnight), cardboard and 3 sheets of wallpaper. It's very light and you only need to stick it using 3M poster strips and some blue tacks. Hence, no drilling required!


PS: I've added pictures of the wallpapers in gorgeous patterns & colors that you can choose from shall you want to order one for yourself (here). Do add me on facebook
Have a great day!

Monday, September 3, 2012

Handmade Gift Ideas: 3D Paper Fonts

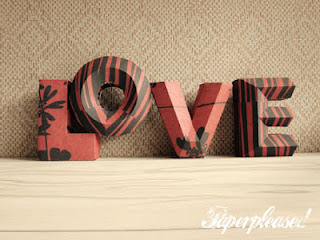
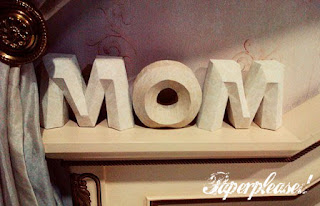
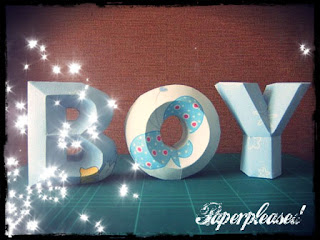
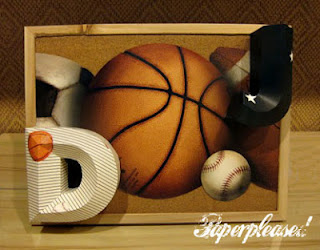
I've been making these 3D Paper Fonts for the past few weeks and i can't seem to get enough of them. 

One of the most popular decor ideas is to put them on walls, windows, fridges, above cabinets, etc, or hang as mobiles and buntings (in your studio or nursery, perhaps?). They also make great table centerpieces for weddings and dinner parties.

My first try at them resulted in a "small" mistake of a front-to-back letter 'L" (see: "LOVE"). Some letters, especially the ones with curves, require extra patience in cutting and putting them together. "B", "G", and "0" proved to be more time-consuming than the rest of the letters i've made so far. I wonder how long "S" would take me *yikes*

I love the fact that they're much lighter than wood, customizable in various patterns&colors, and not to mention the endless possibilities of showing your wit with them. Hurrah!


my first try

for my mom, which she displays on her bedhead

for my nephew's room

for my niece's room

wall art present for my other basketball-crazy nephew